人工智能TensorFlow(十五)CNN 结构(代码实现)
MNIST是一个简单的视觉计算数据集,它是像下面这样手写的数字图片:
MNIST
通过上期的分享,我们了解了手写数字识别的基本原理以及CNN卷积神经网络的基本原理,本期我们结合MNIST数据集,来用代码来实现CNN。(手写数字识别是TensorFlow人工智能最基础的案例,这个跟学习编程语言的hello Word一样)
1、插入MNIST数据集
import tensorflow as tf
import numpy as np
from tensorflow.examples.tutorials.mnist import input_data
mnist = input_data.read_data_sets('MNIST_data', one_hot=True)
2、定义精度函数
def compute_accuracy(v_xs, v_ys):
 global prediction
 y_pre = sess.run(prediction, feed_dict={xs: v_xs})
 correct_prediction = tf.equal(tf.arg_max(y_pre, 1), tf.arg_max(v_ys, 1))
 accuracy = tf.reduce_mean(tf.cast(correct_prediction, tf.float32))
 result = sess.run(accuracy, feed_dict={xs: v_xs, ys: v_ys})
 return result
3、定义Weight变量
def weight_variable(shape):
 inital = tf.truncated_normal(shape, stddev=0.1)
 return tf.Variable(inital)
4、定义biase变量
def bias_variable(shape):
 initial = tf.constant(0.1, shape=shape)
 return tf.Variable(initial)
5、定义卷积核
def conv2d(x, W):
 return tf.nn.conv2d(x, W, strides=[1, 1, 1, 1], padding='SAME')
6、定义pooling池(2X2)
def max_pool_2x2(x):
 return tf.nn.max_pool(x, ksize=[1, 2, 2, 1], strides=[1, 2, 2, 1], padding='SAME')
7、定义placehoder
xs = tf.placeholder(tf.float32, [None, 784]) # 28*28
ys = tf.placeholder(tf.float32, [None, 10])
keep_prob = tf.placeholder(tf.float32)
x_image = tf.reshape(xs, [-1, 28, 28, 1]) # x_image.shape=[n_sample,28,28,1]
8、定义第一层卷积
W_convl = weight_variable([5, 5, 1, 32]) # patch 5*5 ,in_size 1,out_size 32
b_convl = bias_variable([32])
h_conv2d1 = conv2d(x_image, W_convl) + b_convl
h_conv1 = tf.nn.relu(h_conv2d1) # output size 28*28*32
h_pool1 = max_pool_2x2(h_conv1) # output size 14*14*32
9、定义第二层卷积
W_conv2 = weight_variable([5, 5, 32, 64]) # patch 5*5 ,in_size 32,out_size 64
b_conv2 = bias_variable([64])
h_conv2d2 = conv2d(h_pool1, W_conv2) + b_conv2
h_conv2 = tf.nn.relu(h_conv2d2) # output size 14*14*64
h_pool2 = max_pool_2x2(h_conv2) # output size 7*7*64
10、定义第一层全连接层
W_fc1 = weight_variable([7 * 7 * 64, 1024])
b_fc1 = bias_variable([1024])
# [n_sample,7,7,64]->>[n_sample,7*7*64]
h_pool2_float = tf.reshape(h_pool2, [-1, 7 * 7 * 64])
h_fc1 = tf.nn.relu(tf.matmul(h_pool2_float, W_fc1) + b_fc1)
h_fc1_drop = tf.nn.dropout(h_fc1, keep_prob)
11、定义第二层全连接层
W_fc2 = weight_variable([1024, 10])
b_fc2 = bias_variable([10])
prediction = tf.nn.relu(tf.nn.softmax(tf.matmul(h_fc1_drop, W_fc2) + b_fc2))
12、定义优化器与loss
cross_entropy = tf.reduce_mean(-tf.reduce_sum(ys * tf.log(prediction), reduction_indices=[1]))
train_step = tf.train.AdamOptimizer(0.0001).minimize(cross_entropy)
13、初始化
init = tf.global_variables_initializer()
14、训练
with tf.Session() as sess:
 sess.run(init)
 for i in range(1000):
 batch_x, batch_y = mnist.train.next_batch(100)
 sess.run(train_step, feed_dict={xs: batch_x, ys: batch_y, keep_prob: 0.5})
 if i % 50 == 0:
 c = compute_accuracy(mnist.test.images, mnist.test.labels)
 print(c)
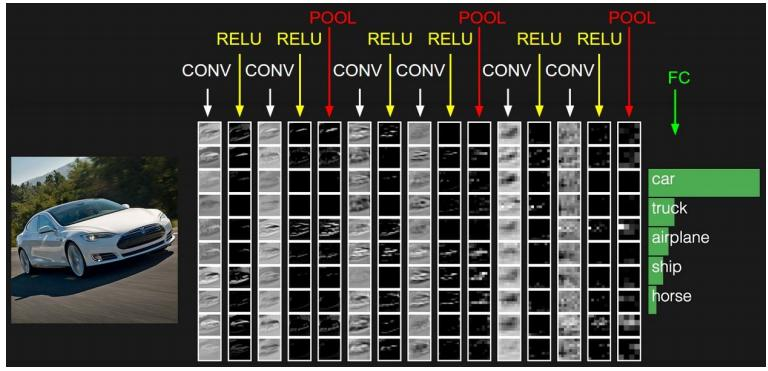
以上便是一个完整的CNN卷积神经网络的结构
下期分享
具体每个步骤的含义,我们下期分享CNN如何来识别MNIST手写数字,来一起分享具体的过程
谢谢大家的点赞与转发,关于分享的文章,大家有任何问题,可以在评论区一起探讨学习!!!


